About PsExec “Access is denied”, PsExec is the root of the problem for most of the time. Depending on the situation, you could take advantage of Registry Editor, make use of Command Prompt and install the latest PsExec version. You don’t know your way around Windows and have a hard time carrying out the solutions? Then this article could help you.
The Number One Suspect: PsExec

All in all, PsExec is a no-nonsense tool that helps Windows users manage remote computers. PsExec usually gives a good account of itself in quite a few settings. That being said, PsExec could act up on occasions and PsExec “Access is denied” is one of the consequences. Unless you take action, there is no way to get PsExec to work as expected.
What You Could Do

Take Advantage Of Registry Editor
- Step 1: Press Windows key, type Regedit and hit Enter to open Registry Editor.
- Step 2: Navigate to the directory HKEY_LOCAL_MACHINE\SOFTWARE\Microsoft\Windows\CurrentVersion\Policies\System
- Step 3: Right-click an empty space on the right, pick New and hit DWORD (32-bit) Value.
- Step 4: Name the new value LocalAccountTokenFilterPolicy.
- Step 5: Right-click the LocalAccountTokenFilterPolicy value, pick Modify and change its value to 1.
Make Use Of Command Prompt
- Step 1: Press Windows key, type secpol.msc and hit Enter to open Local Security Policy.
- Step 2: Navigate to Local Policies>Security Options then set Network Access: Sharing and security model for local accounts policy to Guest only – local users authenticate as Guest.
- Step 3: Hit OK.
- Step 4: Press Windows key, type cmd and hit Run as administrator.
- Step 5: In Command Prompt (Admin), run the command gpupdate /force.
- Step 6: Open Local Security Policy then change Network Access: Sharing and security model for local accounts policy back to Classic – local users authenticate as themselves. Next, run the command gpupdate /force in Command Prompt then restart your computer.
Install The Latest PsExec Version
If none of the above works, there is a good chance that your version of PsExec is outdated. That means once it comes to PsExec “Access is denied”, you should consider installing the latest PsExec version.
Note: Make sure you meet the following conditions before ongoing with the below steps.
- Both the local and remote computers are members of the same Workgroup.
- Both the local and remote computers have file and folder sharing enabled
- The remote computer is correctly configured with the admin share and granted access to its \Windows\folder.
To install the latest PsExec version, go through the steps down below:
- Step 1: Download the latest version of PsExec(link).
- Step 2: Extract the files, open the folder where the extracted files are located, go to the navigation bar, type cmd and hit Enter.
- Step 3: Run commands as you wish.
Frequently Asked Questions (FAQs)
Can I Use PsExec To Run PowerShell Commands?
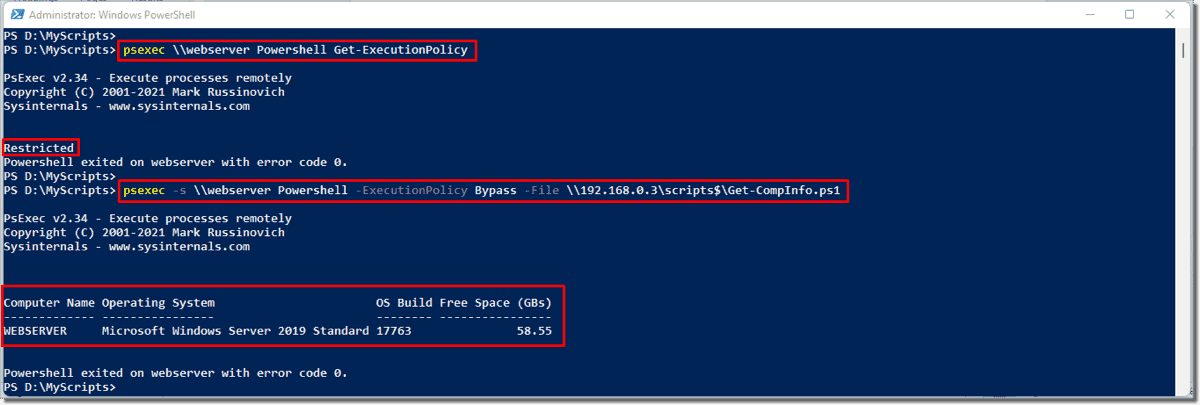
Yes, you can. To use PsExec to run PowerShell commands on remote computers, use the -command parameter. Here is an example: PsExec.exe \\webserver Powershell -command Get-Service w3svc. You can also use the The -ExecutionPolicy Bypass parameter to run PowerShell scripts even if the execution policy on the remote computer is set to Restricted. For instance: psexec -s \\webserver Powershell -ExecutionPolicy Bypass -File \\192.168.0.3\scripts$\Get-CompInfo.ps1.
What Protocol Does PsExec use?
In the course of operation, PsExec uses the Server Message Block (SMB) protocol and port 445. It needs SMB to enumerate the writable shares so it can upload an executable to one of them. Aside from that, the tool also relies on SMB to give users the command output.

I am Anshul Rana, an experienced author specializing in PC gear reviews and Windows 10 software tutorials. With a strong passion for technology and an in-depth understanding of the PC industry, I provide insightful and detailed analyses of computer peripherals, gaming gear, and software solutions. My writing style is concise yet informative, making complex topics accessible to both beginners and advanced users. Through my reviews and tutorials, I aim to offer valuable guidance, helping readers make informed decisions to enhance their PC experience and explore the vast possibilities of Windows 10 software.