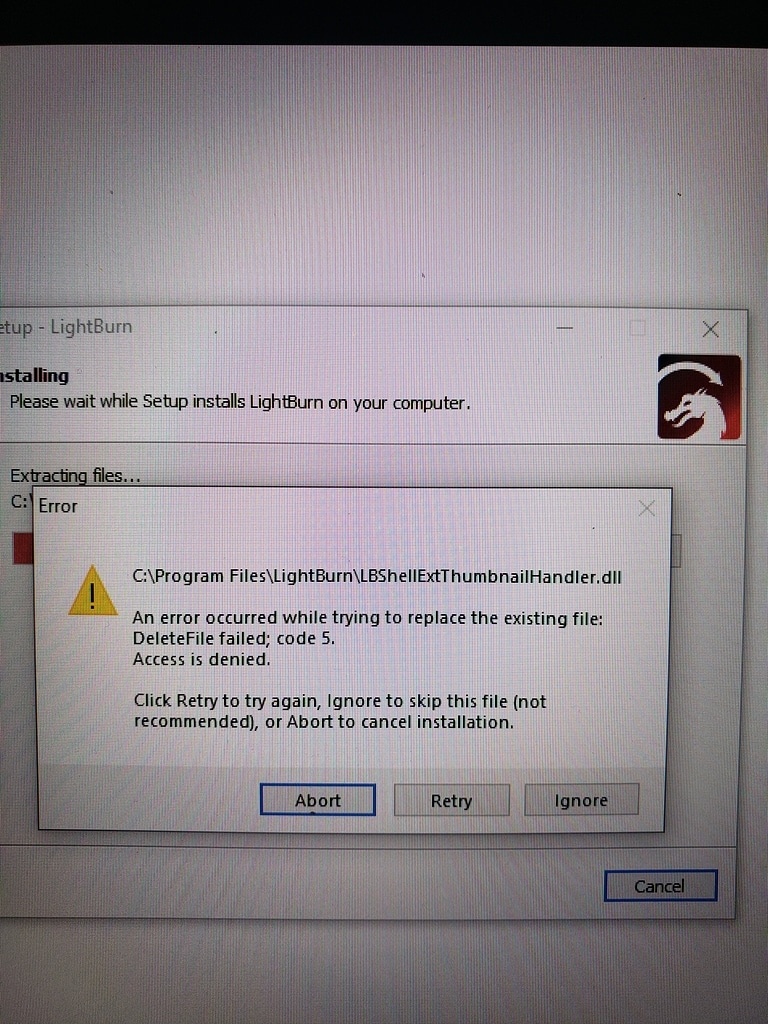
If you come across the error ”DeleteFile failed; code 5” as you install a program, there is a good chance that you lack permission. The best solution in most of the cases is to run the program setup as administrator. Besides that, you could take ownership of the program setup, close background processes, carry out the installation in Safe Mode, perform SFC and DISM scans, … Read to the end to be able to wrap up the program installation.
Related Questions

What is an administrator account?
In layman’s terms, the administrator account is the account that possesses the permission to change security settings, edit files and folders, tweak other accounts, … Needless to say, you must exercise caution once it comes to the administrator account. Unless it’s necessary, don’t log into the administrator account. Also, make sure that only responsible parties could access the administrator account of your PC.
Should I use the admin account in day-to-day operations?
Generally speaking, you might be able to save a bit of work if you use the administrator account as your daily account. That also exposes your computers to a lot of dangers though. For instance, if a virus manages to take control of the administrator account, it could wreak havoc on the PC.
The Prime Suspects
All in all, the installation of programs on Windows could run into a lot of errors. In the case of ”DeleteFile failed; code 5”, you should give the following suspects some thought:
- Permission.
- Background processes.
- Interference.
- Corruption.
Things You Should Do
Run As Administrator
- Step 1: Locate the program setup, right-click it and pick Run as administrator.
- Step 2: Follow onscreen instructions.
- Step 3: Restart your computer.
Note: Alternatively, you could log out of your account, log in using the administrator account and run the program setup. It’s possible to change your account into an administrator one too. All you have to do is to go through the steps down below:
- Step 1: Press Windows + I to open Settings, select Account then choose Family & other users.
- Step 2: Click your account, pick Change account type and set Account type as Administrator.
- Step 3: Hit OK, restart your computer and run the program setup again.
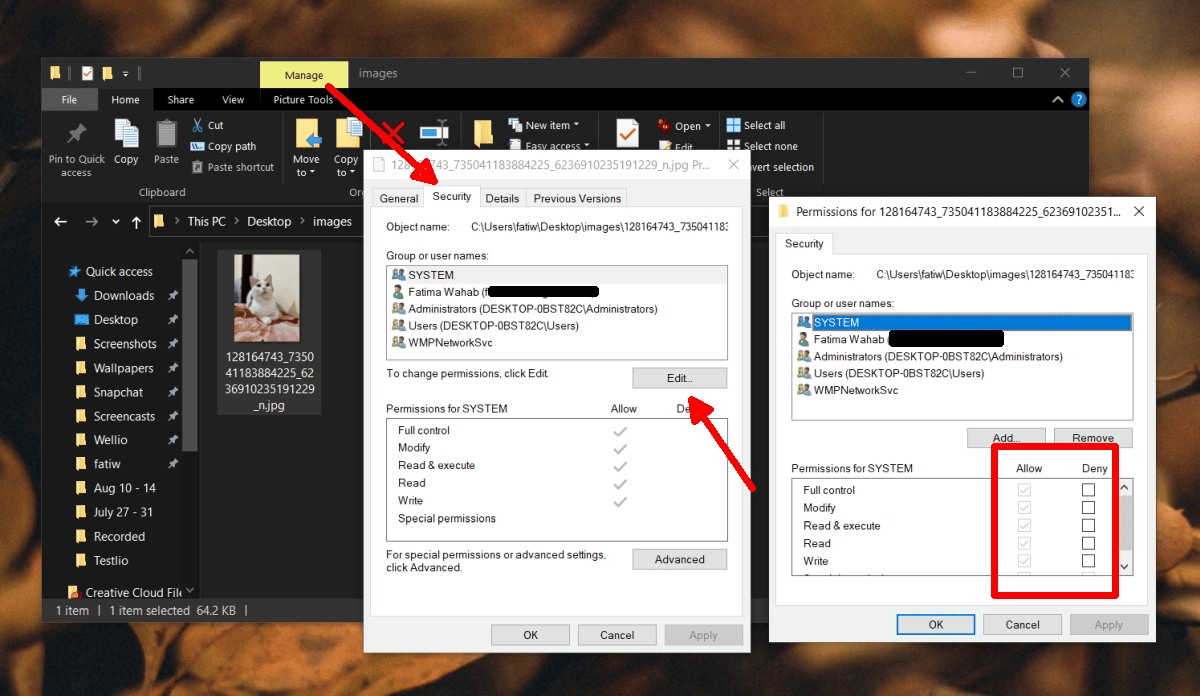
Take Ownership
- Step 1: Locate the program setup, right-click it and pick Properties.
- Step 2: Go to Security tab, select Advanced and choose Change next to Owner.
- Step 3: Hit Advanced, click Find Now and pick your account.
- Step 4: Select OK, choose OK, check the Replace Owner on Subcontainers and Objects checkbox, click Apply and pick OK.
- Step 5: Back to Properties, click Edit under Groups or usernames and pick your account. Next, check the checkbox next to Full control under the Allow column, select Apply and choose OK. Proceed to close everything then restart your computer. When the screen comes
Close Background Processes
- Step 1: Press Ctrl + Shift + Esc to open Task Manager.
- Step 2: In Processes, locate non-essential processes, select each of them and choose End Task.
- Step 3: Close Task Manager, run the program setup and see how things turn out.
Install In Safe Mode
- Step 1: Press Windows + I to open Settings, select Update & Security then choose Recovery.
- Step 2: Hit Restart now under Advanced startup and wait as your PC restarts.
- Step 3: In Choose an options screen, go to Troubleshoot > Advanced options > Startup Settings > Restart.
- Step 4: You could press either 4 (F4) to boot into Safe Mode or 5 (F5) to boot into Safe Mode with Networking.
- Step 5: Run the program setup then determine whether the issue persists.
Perform SFC And DISM Scans
- Step 1: Press Windows key, type cmd and hit Run as administrator.
- Step 2: In Command Prompt (Admin), type sfc /scannow and press Enter to perform the SFC scan.
- Step 3: After the SFC scan finishes, type the following commands in Command Prompt (Admin) and press Enter each time you complete one to perform the DISM scan:
- DISM /Online /Cleanup-Image /ScanHealth
- DISM /Online /Cleanup-Image /CheckHealth
- DISM /Online /Cleanup-Image /RestoreHealth
- Step 4: Type the command exit and press Enter to close Command Prompt.
- Step 5: Restart your computer then run the program setup.


I am Anshul Rana, an experienced author specializing in PC gear reviews and Windows 10 software tutorials. With a strong passion for technology and an in-depth understanding of the PC industry, I provide insightful and detailed analyses of computer peripherals, gaming gear, and software solutions. My writing style is concise yet informative, making complex topics accessible to both beginners and advanced users. Through my reviews and tutorials, I aim to offer valuable guidance, helping readers make informed decisions to enhance their PC experience and explore the vast possibilities of Windows 10 software.