Regarding Windows 10 Timer not working, Alarms & Clock is usually at fault and to fix it, you must reset the app. Depending on the situation, you should consider uninstalling and reinstalling Alarms & Clock, clearing Windows Store cache, performing SFC and DISM scans, using System Restore, … You don’t know your way around Windows and could use some help? In that case, this article is exactly what you need.
Windows 10 Timer Won’t Work Work: Overview
It’s not uncommon for Windows features to malfunction but once it comes to Windows 10 Timer not working, you should keep these suspects in mind:
- Bugs
- App
- Corruption
Ways To Get Windows 10 Timer Back To Work
Reset Alarms & Clock
Generally speaking, Alarms & Clock is a no-nonsense app but like other apps, it could bug out all of a sudden. To get rid of Alarms & Clock bugs, it’s strongly recommended that you reset the app.
- Step 1: Press Windows + I to open Settings then go to Apps.
- Step 2: Locate Alarms & Clock in Apps & features, select it then choose Advanced options.
- Step 3: Hit Reset, confirm your action and let the process run from start to finish.
- Step 4: Restart your computer.
- Step 5: When the screen comes back on, determine whether the issue persists.
Uninstall And Reinstall Alarms & Clock
- Step 1: Press Windows key, type Windows PowerShell and hit Run as administrator.
- Step 2: In Windows PowerShell (Admin), run the command get-appxpackage *Microsoft.WindowsAlarms* | remove-appxpackage to uninstall Alarms & Clock.
- Step 3: After the process finishes, restart your computer.
- Step 4: Reinstall Alarms & Clock.
Clear Windows Store Cache
- Step 1: Press Windows key, type WSReset.exe and press Enter.
- Step 2: Allow the process to go all the way.
- Step 3: See how things turn out.
Perform SFC And DISM Scans
- Step 1: Press Windows key, type cmd and hit Run as administrator.
- Step 2: In Command Prompt (Admin), run the command sfc /scannow to perform SFC scan.
- Step 3: As soon as the SFC scan completes, run each of these commands to perform the DISM scan:
- DISM /Online /Cleanup-Image /ScanHealth
- DISM /Online /Cleanup-Image /CheckHealth
- DISM /Online /Cleanup-Image /RestoreHealth
- Step 4: Proceed to run the command exit to close Command Prompt.
- Step 5: Restart your computer.
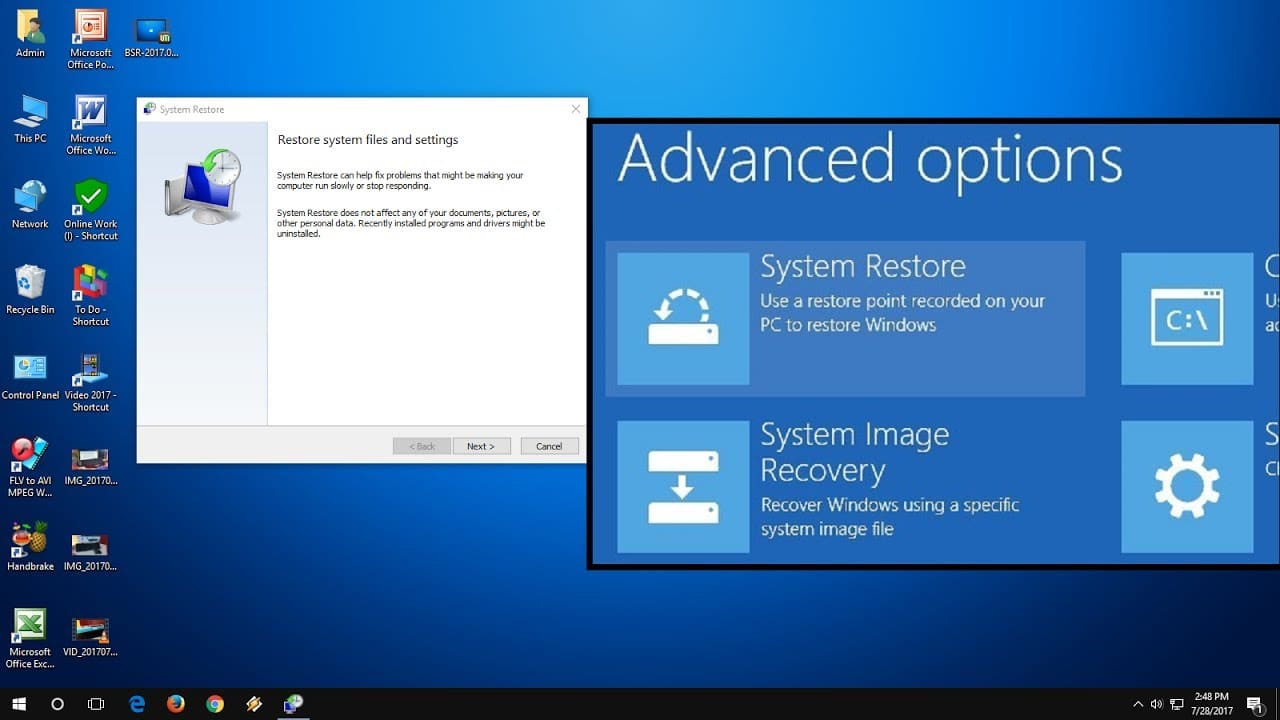
Make Use Of System Restore
- Step 1: Press Windows key, type System Restore and press Enter.
- Step 2: Select System Restore, choose a restore point and initiate the restoration.
- Step 3: Wait until the restoration wraps up then test out the timer.
Commonly Seen Questions

What should I do if the alarm clock is not working?
- Take a look at alarm settings.
- Set the correct date and time.
- Enable notifications.
- Increase system volume and disconnect headphones.
- Disable Focus Assist.
- Reset Alarms & Clock.
How do I create a new alarm?
- Step 1: Press Windows key, type Alarms & Clocks and hit Enter.
- Step 2: Hit + to create a new alarm.
- Step 3: Set the alarm time, name, sound and length.
What must be done if Internet time syncing won’t work?
Via Command Prompt
- Step 1: Press Windows key, type cmd and hit Run as administrator.
- Step 2: In Command Prompt (Admin), run the commands down below:
- w32tm /debug /disable
- w32tm /unregister
- w32tm /register
- net start w32time
- Step 3: Sync time again.
Via Services
- Step 1: Press Windows key, type services and press Enter to open Services.
- Step 2: Locate Windows Time, right-click it and pick Properties.
- Step 3: If Service status says stopped, hit Start. If Service status says running, hit Stop, wait for a moment and hit Start.
- Step 4: Change Startup type to Automatic.
- Step 5: Select Apply, choose OK and restart your computer.
Via Date and Time
- Step 1: Press Windows key, type timedate.cpl and press Enter.
- Step 2: Navigate to the Internet Time tab.
- Step 3: Hit Change settings, click the dropdown arrow next to Server and pick another server.
- Step 4: Choose Update now then select OK.

As PCWorld’s senior editor, Mark focuses on Microsoft news and chip technology, among other beats. He has formerly written for PCMag, BYTE, Slashdot, eWEEK, and ReadWrite.